Showing posts with label playroom. Show all posts

Tuesday, April 23, 2013

on the boards: playroom/workroom {part 4}

We're Baaaaa-ack!

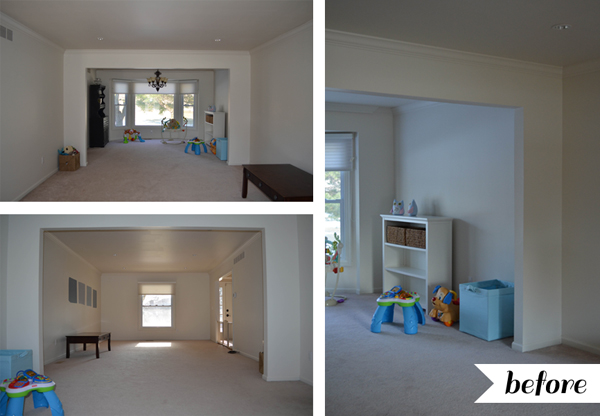
Once upon a time, back in February, I began working with my friend Jane to convert her unused formal living and dining rooms into a playroom for her daughter and a workspace for her.  See more here, here and here.

After an extended winter of exchanging one illness for another (is it spring yet??!?), we were finally able to regroup several weekends ago and this is what we did . . .


The weekend before my birthday was packed with plans, some known, some unknown (at the time), but I was pretty busy in the week prior prepping for one plan in particular: the building of the storage bench for Jane's playroom, first mentioned here.

The planning for this build required a lot more preparation than I had originally anticipated.  Jane and I gathered all the necessary tools, and calculated costs, and lengths, and heights, and widths in the few days leading up to the build.  We felt good about the seemingly solid plan we had in place, but were both still a little nervous.  I knew how these things could go . . . all is running smoothly until you make a bad cut or split the wood with a screw, and you're hopes are left beaten to a pulp and lying in the gutter.  OK, I'm being overly dramatic, but you get the picture.

Here is the bench design we came up with to house the two large storage bins for the playroom.


I created a shopping list for Jane, and then a separate cut list with the measurements for all of the pieces we would ultimately need to assemble the bench.  This made things very easy on build day.

We got a quick, mid-morning start on Sunday, first cutting down all of the straight "stick" stock with the compound miter saw.  We then took all of the pieces inside to the basement (it was a bit chilly outside) and attempted to set up guides for the hand-held router.  You can see, as evidenced in the photo below, that the first guide was crap!  Luckily this was a test piece, and we corrected the issues and began cutting fo' real!


All was going smoothly as we completed cutting the grooves in all of the legs and cross supports for the 1/4 recessed side and back panels to slide into.  Feeling quite accomplished, we headed back outside to setup the guides, measure, and cut the panels.  We didn't have a table saw so we planned to use a circular saw to make the cuts.  The edges didn't need to be perfect as they were going to be hidden in the grooves we'd just cut earlier, but this expectation of imperfection didn't prepare me for our complete inability to even accomplish this final cutting task.  The circular saw kept jamming up in the material after making about a 4" cut into the wood.  Not wanting to risk getting hurt or completely ruin the material, we decided to call it quits and ask a friend with a dream wood shop to make the cuts for us on his table saw.  What would surely have taken us hours to complete would only take him ten minutes.


But the realization that we weren't going to finish the day with something assembled left us both feeling a bit down.  Maybe not as beaten up as I had originally thought a setback might make me feel, but just sad.  So much had been going right and my confidence was growing with each successfully accomplished task.  In any case, we cleaned up our mess and laid out all of the pieces we had cut and felt pretty proud.  I'm looking forward to getting these last few pieces cut and the bench assembled in the coming week and finally posting a completed project for this playroom.

Wednesday, March 6, 2013

on the boards: playroom/workroom {part 3}

I completed the floor plan for Jane's playroom and workroom/living space last week. The multi-purpose room came together more easily than I had anticipated.


Your first view into the workroom from the foyer will be of Jane's workspace. She is an incredibly organized and tidy person, so we weren't worried about it being front and center. The orientation of the desk allows for a direct view into E's play space so that Jane can keep an eye on her while she's working. We will help define the space with a rug and will use a floor lamp to save valuable desk top area. Jane already owns an IKEA EXPEDIT shelf in black-brown. We'll place that to one side of the window and either purchase a new EXPEDIT shelf to match or find a small round side table for the opposite corner. A collage of small framed photos and prints above the side table will help to balance the weight of the EXPEDIT shelf in the opposite corner.

The remainder of the former living room will function as a scaled-down living space with a large coffee table we'll re-purpose into a fun game table. An existing cabinet base, already painted a medium grey, will sit against the wall and provide additional storage space (and perhaps a place for a small television in the future). We'll try and find two inexpensive but interesting and comfortable chairs to flank the cabinet.  And, when Jane and her husband find a new sofa for their family room, we'll move their existing brown leather sofa into this space.

In the playroom, we'll hand paint a neutral rug with a bold pattern and soothing colors to anchor the space.  Flanking the bookshelf, we will install four sensory panels for E to explore - a magnet board, a chalk board, a felt panel, and a TBD board (accepting all suggestions).  In the bay window, a DIY mobile will hang above a child's table and chairs.  And to finish it all off, Jane and I will tackle our biggest DIY project yet - a reading bench to accommodate two large storage bins complete with upholstered cushion and fun pillows.

Jane and I met yesterday morning to review the floor plan for the two rooms and to create our DIY project list.

DIY Project List:

1_ Painted area rug inspired by i heart organizing
2_ Sensory wall using IKEA SPONTAN magnet boards
3_ Custom desk side panels and cord management solutions
4_ Mobile for playroom
5_ Chalkboard game table inspired by BHG via Pinterest
6_ Frame and display wall collages
7_ Floor length curtains

Now to decide what to tackle first!

Wednesday, February 27, 2013

on the boards: playroom/workroom {part 2}

Jane and her husband bought a great house with a few big projects that needed tackling (kitchen: check, powder room: check), but mostly, it was just a fantastic blank canvas for making their own. Their next project will be to turn the formal living and dining spaces, rooms they currently do not use, into a more functional play space for Baby E and work space for Jane.  I'm going to tag along with Jane on her room re-do journey and share it all with you here, every Tuesday, from design inspiration to what are sure to be the amazing AFTER photos.

This week I present to you the BEFORE pictures of Jane's formal living and dining spaces.  See what I mean about a blank canvas!


This week I met with Jane to measure the space and take stock of any existing furniture to be re-used and/or re-purposed for the space.  We also had a chance to talk more about her wants and needs for the space and this is what came up:

1. Locate play space in the former dining area, out of immediate view of the front entry.

2. Provide an arts and crafts area and art display solution in the play space.

3. Utilize as many existing pieces as possible.

4. Provide a space that can easily transition back to a more adult space in the future.

5. Identify a location for large toy storage solutions.

6. Create a plan that can be executed in stages. 

Jane had also chosen four color samples for the room, and painted them on the wall.  Paint and hardware stores now carry sample sized containers of paint mixed to any color you choose for a few dollars each.  This is a step that there is no longer any excuse to skip.  Make sure to get a range of shades to test on your wall, and see how they look in the light of your room, at all times of day.  It's much easier to paint a room once!

After looking at the colors for a week, Jane and her husband agreed on the Van Courtland Blue for both rooms.  As painting gets underway, I have begun working on the floor plans.  Check back in next week for finalized floor plans for the room and a round-up of all the DIY projects we hope to tackle to bring these rooms to life!


Tuesday, February 19, 2013

on the boards: playroom/workroom {part 1}

I had the pleasure of hanging out today with one of my most creative and talented friends, Jane, and her adorable 10-month old daughter. Jane and her husband bought a great house with a few big projects that needed tackling (kitchen: check, powder room: check), but mostly, it was just a fantastic blank canvas for making their own. Their next project will be to turn the formal living and dining spaces, rooms they currently do not use, into a more functional play space for Baby E and work space for Jane.

This re-purposing of spaces reminded me of a recent article in my BHG magazine, where Jaime Favor converted her unused formal living room into her dream craft room.  Check out photos here.  Why reserve rooms in your home for spaces that only get visited a few times a year when you could re-purpose them into spaces you'll never want to leave!  I'm going to tag along with Jane on her room re-do journey and share it all with you here, every Tuesday, from design inspiration to what are sure to be the amazing AFTER photos.

But before we dive into the BEFORE shots, I think a little design inspiration is in order. I love to start projects in different ways, depending on the problem(s) to be solved. In this case, there aren't many problems, just a large space (which most would die for!).  Jane headed to the fabric store this past weekend for her inspiration, to start pulling swatches and putting together a cohesive color story for the entire main floor of her house.  I think this is such an important step when you will be doing a project gradually. Once you've accomplished this step, it gives you a clear framework to shop within, as the need and ability to acquire additional pieces arise.  In this case, we know that the room will need to be able to change and grow as baby E gets bigger.  Design is never static!

Here is a little inspiration from Jane's shopping trip: 

from right to left: Rebecca Fern \ Zig Zag \ Ajanta Handprint \ Kilburn Surf

and from our conversation today about what she is envisioning for the space:


Related Posts Plugin for WordPress, Blogger...